Thursday, 1 September 2016

HOMESENSE


Unique Storage 


Fab Furniture 


Al Fresco dining


Cool Kitchenware

A couple of years ago whilst visiting my Son and Daughter in law they introduced me to the HomeSense in Chichester  and I loved it!

HomeSense is the sister company of TK Maxx and carries top quality glass and tableware, soft furnishings for the home and garden, a huge range of bed linens, towels, professional cookware, bathroom accessories, lighting and much more for your home including seasonal products. Like TK Maxx, HomeSense operates a policy of opportunistic buying and a no-frills set-up to deliver a unique off-price concept, that offers one-off pieces, familiar brand names and designer home products at affordable prices.
I was there to buy my birthday present, I immediately headed to the silk flower section where I found rows upon rows of gorgeous flowers, pretty vases and lots of floristry accessories. From there I headed to the baking section where I found pretty cake papers, gorgeous cake stands and edible cupcake decorations that you don't often find in the usual department stores. Pondered over the vast selection of garden ornaments, I was like a child in a candy store and filled my basket with all my lovely finds 3 large hydrangea heads, a couple of Pecksniffs candles and a pretty baking apron. I am now trying to work out when I can visit a HomeSense store again as I was so impressed with all the unique finds!

Links-


Wednesday, 31 August 2016

MATALAN AUTUMN/WINTER 2016 HOME COLLECTION


Today I would like to share with you one of my favourite stores

Matalan is a British fashion and homeware retailer based in Knowsley, United Kingdom. In 1985, it was established by John Hargreaves. Matalan have 217 stores across the United Kingdom.

Offering stylish and new ideas for your home this autumn winter their homeware collection reflects  key seasonal moments so you feel comfortable and cosy. 
From rustic autumnal to ice blues and grey colour pallettes to suit all personalities and home styles.

RUSTIC TREND

The modern rustic design is elegant, yet brings some warmth to the home. With a mix of natural hues, distressed finishes, and warm textiles.


I decided that my colour scheme for this autumn would be based on these colours purely for the fact that I fell in love with the yarn... Rooster Almerino DK and just had to include it in my design.


I will be making some pretty crotchet cushion covers for the bedroom. Here are a few key pieces from MATALAN that will sit nicely with this scheme


Wire storage basket in copper effect. Features 'This & That' plaque. Dimensions 26cm x 19cm.


Printed check fleece throw in cream brown and orange. Dimensions: 150cm x 130cm.


         Large check cushion in orange with piped edging. Dimensions: 58cm x 58cm


Hare watercolour print cushion in natural with green piping. Dimensions: 45cm x 45cm

Tilda Cabbage Rose Fabric Rabbit and Roses Ginger:

I am going to make some Lavender heart sachets with my Tilda fabric that I purchased from Ebay. 
The yarn is from Loveknitting 

I will post projects at a later time x


Links:   Tilda   www.tildasworld.com/ Matalan www.matalan.co.uk/ Ebay www.ebay.co.uk 
Loveknitting www.loveknitting.com/


TILDA MEMORY LANE AUTUMN/WINTER COLLECTION 2016


                                            Memory Lane-01


                                             The second new Tilda collection is Memory Lane and as always the two collections go together beautifully! Save 10% on the collection bundles and for a limited time only save 15% on the Memory Lane & Cabbage Rose big bundle! <a class="pintag searchlink" data-query="%23memory" data-type="hashtag" href="/search/?q=%23memory&rs=hashtag" rel="nofollow" title="#memory search Pinterest">#memory</a> lane <a class="pintag searchlink" data-query="%23Tilda" data-type="hashtag" href="/search/?q=%23Tilda&rs=hashtag" rel="nofollow" title="#Tilda search Pinterest">#Tilda</a> <a class="pintag searchlink" data-query="%23tildafabrics" data-type="hashtag" href="/search/?q=%23tildafabrics&rs=hashtag" rel="nofollow" title="#tildafabrics search Pinterest">#tildafabrics</a> <a class="pintag searchlink" data-query="%23tildamemorylane" data-type="hashtag" href="/search/?q=%23tildamemorylane&rs=hashtag" rel="nofollow" title="#tildamemorylane search Pinterest">#tildamemorylane</a> <a class="pintag searchlink" data-query="%23tildacabbagerose" data-type="hashtag" href="/search/?q=%23tildacabbagerose&rs=hashtag" rel="nofollow" title="#tildacabbagerose search Pinterest">#tildacabbagerose</a> <a class="pintag searchlink" data-query="%23cabbagerose" data-type="hashtag" href="/search/?q=%23cabbagerose&rs=hashtag" rel="nofollow" title="#cabbagerose search Pinterest">#cabbagerose</a>:


The second new Tilda collection is Memory Lane and as always the two collections go together beautifully!.

"The Memory Lane collection is inspired by the 1920s, with its innovative fashion and colours, jazz, the Charleston and Art Deco. The patterns comprise both classic and more modern floral designs.

Colours such as bluish-black, olive green and off-white with hints of pink and turquoise result in a beautiful, interesting combination for a style that is both classic and perfect for today.
The series is excellent for both patchwork quilts and formal bags."

All the fabrics are 100% cotton, machine washable to 40°c and 110cm wide. They are available by the metre, in fat quarters, as well as in various bundles.

To complement the fabrics there are coordinating ribbons, buttons and sewing threads to embellish those special cards, home accessories and more. For an instant no- sew fix there are adhesive fabrics and tape that are great for appliques, elegant edgings and other decorative details. There’s even a pattern to make your own hexagonal quilt and you can give your finished creation a personal touch with the gloriously coloured quilt labels.
Have hours of fun making up the two delightful patterns for dressing up the readymade friendly fox, one is a cute dress with wings and the other a dashing top with stylish trousers to suit the mood of the moment
Everyone will love going down Memory Lane and, whichever crafts you choose to make from this wonderful range, you’ll find plenty of scope to mix and match for a unique, coordinated look.


TILDA CABBAGE ROSE AUTUMN/WINTER COLLECTION 2016


                                 Люсиль-Ball:


Cabbage-Rose-3:


Today I want to share with you one of the new Tilda collections, Cabbage Rose...

"The Cabbage Rose Collection is a playful series inspired by colourful characters like 1950s comedian Lucille Ball and Astrid Lindgren’s Pippi Longstocking.

Designs with rabbits and flowers in soft orange, blue-green, red and pink give the series a sweet and colourful feel – perfect for pleasant patchwork quilts combined with folklore appliqués.

Cabbage Rose is an homage to “everyday roses” who inspire and add colour to life with their creativity and joie de vie."

Along with the new collection Tilda has also introduced the new Rabbit and Squirrel Patchwork kits. 
They are perfect projects for anyone who loves to sew and the right size project for new beginners who wants to learn patchwork. The animals can work as decorative pillows and are perfect for children’s rooms. 


All the fabrics are 100% cotton, machine washable to 40°c and 110cm wide. They are available by the metre in fat quarters and various bundles. To complete the range there are floral buttons, ribbons, adhesive tape and fabric sheets as well as colour coordinated thread. Pretty clothes pegs can be used to attach a message to your finished work of art, all giving endless scope to your creative crafting.


Tilda products are available nationwide from sewing, fabric and craft suppliers. 


Tuesday, 30 August 2016

Autumn


Autumn colour in Richmond Park #freshairlondon:
Autumn @ Richmond near where I live


Today I want to start celebrating  Autumn, and I want to give a grand welcome to a cosy friend who returns loyally each and every year. Where everything bursts with it's last beauty, as if nature has been saving all year for it's grand finale.

Autumn for her warm colors, orange, brown, yellows, the odd splash of red and the shades of gold, make this period full of magic with intense atmosphere!

It's that time of year when all the new Autumn/Winter collections are out and my creative thoughts are turning to adding a few Autumn touches to my home and garden along with handmade and shop brought accessories needed to keep it looking cosy, chic and tidy.


Over the next few days I look forward to sharing lots of autumnal Inspiration and projects.

Thank you for visiting x


Friday, 5 August 2016

I Have been neglecting you....

I am sooo sorry, I have neglected you my dear friends, my blogging mojo has been buried beneath new and old projects that simply either had to be organised, started or completed and I am getting there....
One of my projects is to get my PinkPeonyPetals Baby clothes range out there and with the help of Joanne who has to be the best seamstress in the whole of Whitton, I will succeed.
I have started to sell on FB and have opened a shop on Etsy.
Another of my projects is that I am planning a new look blog for PinkPeonyPetals, which I am working on at the moment this will enable me to tie in my website. I am hoping that everything will be in place by the Autumn.
Thank You for your patience, I will be back Blogging after a short break


Friday, 10 June 2016

Designing and organising our workspace


When you sit down to design how your space is going to work for you, storage is going to be at the top of your list, it has to meet your needs and be flexible enough to adapt to your ever changing needs.
Storage doesn't just have to be practical, if it's pleasing on the eye then have it on show purely for inspiration.

I have always been a bit of a storage "Junkie". not only do I love the process of organising, I love beautiful and stylish containers. What I don't love is the impact it could have on my purse.
 Therefore...  when I have the need to take on more storage my first step is to plan and design with the materials I already have, more often or not I end up with beautiful creative storage on a shoe string. Over the years of course my storage needs have changed but I always go back to the old faithful's....

Cardboard boxes.... these are going to come in all shapes and sizes; I favour shoe and cereal boxes, paired with paint, fabric or decorative paper you can have a high end look for a few pence.


These boxes were given a couple of coat of paint and the edges were gilded with gold


cereal boxes covered in patterned paper 


 Jars and tin cans.... jar/tin can storage has gone viral over the last few years, however if you don't have any to hand start your collection wash out all your jars and tins, soak them in very hot water give them a good scrub and the label should just peel off if you are left with a little glue residue a good scrub should do the trick.
Jars can be left plain, paint the lids or cover with fabric and add a small glass knob or bead.
tins can be painted, covered in pretty paper or fabric.


These tins look so pretty wrapped in paper


Pretty and practical


Painted muffin tin perfect for storing little bits and pieces when working on a project

A large giant jar ideal for all those little scraps you can't bear to throw away


Pretty box for pretty vintage millinery


These boxes have been covered in co-coordinating
patterned paper I love them

I love this peg board everything is to hand, its near perfect


Thursday, 21 April 2016

All about PinkPeonyPetals 2016

Welcome to my blog & business PinkPeonyPetals where we hope to embrace all things beautiful, homemade & handmade.

As a young girl I loved to design & create from miniature dolls house furniture made from matchboxes to completely designing my bedroom adding lots of pretty handmade accessories often using recycled materials. 

I learnt to knit & crotchet at a young age and continue to this day it has got to be one of my favourite crafts. I learnt to sew and embroider at school and have recently enjoyed making fabric or felt flowers for some new projects. We also have lots of other projects and items for sale we sell on FB. Etsy & EBay.


PinkPeonyPetals will be sharing lots of  tutorials, handy tips & ideas.

I will break down the categories into home decor, organisation, accessories, gifts, celebrations, baking & lots more each week PinkPeonyPetals will choose one or two topics & post lots of ideas, tutorials & favorite blogs on the subject.

I am extremely excited on the new path I want to take and I hope you all enjoy PinkPeonyPetals and join me on our pretty journey.

PinkPeonyPetal's web site is still under construction watch this space.

Catch up with us on Facebook

PinkPeonyPetals welcomes your comments, please be respectful.

Thank you for your continued support x

Friday, 1 April 2016

Deep clean your towels

BrightNest | Smelly Towels? 4 Easy Ways to Fix It


Towels would seem to be such a utilitarian object that they could never need any sort of optimization. As your towels age however, their absorbency decreases. Boost them back to their glory days with this simple hack.
If you're in the habit of using the amount of detergent recommended on the bottle, which is almost always way more than you need, and then hitting towels with fabric softener or dryer sheets you're setting yourself up for towels that lose their absorbency and can even begin to stink.
That's right, most of the time stinky towels aren't a result of failing to wash your towels enough but using too much detergent and fabric softener. The short of it is this: more isn't better and over time soap residue can accumulate within the fibres of the towels ensuring that not only do they fail to absorb as much water as they can but they also don't dry as effectively as they should. When your towels seem to get a funky smell immediately upon getting wet again, failure to dry completely thanks to soap residue is usually the culprit.

What can you do? Saving your towels is as simple as running them through two hot loads. Skip the detergent on both loads, run them through once with hot water and a cup of vinegar and then again with hot water and a half cup of baking soda. Your goal, whether washing brand new towels or old towels, is to strip the softener and detergent reside from the fibres of the towel and get them as absorbent as possible.


Saturday, 26 March 2016

Easter Tea


Fairy Cakes


Fairy cakes_8875_4


Instead of cupcakes I think I will make these Fairy Cakes..

Fairy cakes the British version of "cupcakes",  they are so very pretty and sweet. While there are plenty of fairy cake variations out there, I am crazy for the classic, flat-topped version. These are typically a light Genoese cake iced in pretty pastel tints - a delicate flower or two adorning their velvet-smooth tops. Sweet simplicity.

I decided to make some yesterday.  I skipped the Genoese and just used one of my favourite yellow cake recipes.


Fairy cakes_1

 The secret to the fairy cake's elegance is that perfectly smooth, level iced-top.  This can be achieved by only filling your fairy cases a little over half-way full with batter.  This ensures that the top of your cake doesn't rise past the ruffled top-edge of your cases.
You'll also need to wait until your fairy cakes are completely cooled before you ice them.  You will need to make a simple, fondant-style glaze.  You can find recipes on-line, but I just make my own using cream, confectioner's sugar, a bit of vanilla extract, and a touch of food colouring. It's always a good idea to sift your confectioner's sugar before using it.  This only takes a second (you can just pass it through a fine strainer) and will keep your icing from being lumpy.  Slowly add the cream to the sugar until you get the consistency needed - it should be thick, but also thin enough to pour.  Also, remember to tap your bowl of icing on the counter several times to remove any air bubbles.  Then slowly spoon over the tops of your fairy cakes, being careful to just fill them to the very top of the cases without spilling over the edge.  If you still see any air bubbles on the surface, use a toothpick to "pop" them.

This icing tends to set up quickly, so be sure to add any decorations right away or you will "crinkle" your tops (and we wouldn't want that to happen, now would we!).  I added little pastel royal icing sugar flowers to mine...
Fairy cakes_8882_9

I think I am going to make mini ones (petit four size).... pretty enough  for an Easter treat instead of chocolate.


Friday, 25 March 2016

So long, farewell, auf wiedersehen, goodbye.....


As we bid adieu to Winter and usher in Spring, it's the perfect time to purge, clean and organize. For some of us, spring cleaning seems daunting and downright tedious, but it doesn't have to be. Every year I look forward to spring-cleaning giddy with excitement waiting for the Spring Cleaning season to arrive. This makes me sound so sad....
This year I took January as a planning, gathering month, which means I have everything in hand.
On the first day of Spring, March 20, I will tackle one area of the home and share insights and tips to make your own project easier.
I decided to start in the kitchen, although it is new, there are still bits that need a good clean, cupboards to de-clutter, and possibly a few new little treats I could make.


Before I start there a couple of things I like to do...

Have 2 lists a "nice to do" and a "need 2 do" I keep to this as I may not have time to do them all I often leave the "nice 2 do" list till after the hard work is done.
Have a bottle of water with me, wear loose clothing and suitable footwear especially if I'm going up a ladder.
Collect all the tools and products I will need and keep them to hand, I don't want to waste time. I have a cleaning caddy to organise my cleaning tools "I think of it as my cleaning toolbox."
Put the music on... I love to cleaning to music and for me it has got to be Capital Gold.
OK we are all set to go...


If you have a basic cleaning kit, you probably have most of your cleaning supplies all ready to go. I try to use green cleaners as much as possible and have cut back drastically on the amount of cleaning products that I buy, I pretty much use my microfiber cloths, they don't just push dust around, they grab it and remove it. They're also reusable -- and therefore green, a polishing cloth, also paper towels and handmade cleaners for about 80% of my kitchen cleaning. Here is my handmade kitchen cleaner list that I use…
Kitchen grime away

Ingredients: 
1 1/2 cups baking soda 
1/2 cup vegetable oil-based soap 
1/2 cup water 
2 tablespoons vinegar 

Instructions: 
Find an old cleaning supply spray bottle or purchase a new one. Be sure to clean the bottle well if you are using an old one. Add all the ingredients to the spray bottle. 
Shake the bottle well to mix all the ingredients and dissolve the baking soda. 

To use, spray on tile, floor, shower, tub, toilet, or sink and wipe clean with a damp sponge or rag. 

Kitchen bacteria buster 

Ingredients: 
1 teaspoon baking soda 
1/2 teaspoon organic dish soap 
2 teaspoons vinegar 
Warm water 
20 drops lemon essential oil 

Instructions: 
Use a funnel to put the baking soda into a spray bottle. 
Add the soap and vinegar to the bottle. Shake the mixture well. 
When the mixture stops foaming, fill the bottle the rest of the way up with warm water. Shake again. 
Add essential oil to give your cleaner a fresh scent. Shake again to mix well. 
To use cleaner, simply spray on appliances, counter, or floor then wipe clean with a sponge or cleaning rag. 


No matter how you choose to clean, try following these simple rules to keep yourself on track and cut down on that cleaning time…
Start cleaning from the top of the room and work your way down starting on the left side of the room and heading clockwise. "It can save tons of time -- no wasted steps or backtracking. This is the fastest way to get things done and will cut down on dust falling on areas that you have already cleaned.

Clean the dirtiest things first in case the mess ends up spreading around.
Dedicate a specific amount of cleaning time and then set a timer. Work as fast as you can within this time and don’t let yourself get distracted.
Stay in the kitchen!! I tend to get easily side tracked when I am cleaning, and often get distracted if I leave the room and see other things that need to be done. {Please tell me I am not alone in this!}

Quick tidy before you officially start, take a few minutes to clear away items that do not belong in the kitchen and place them in a bin or basket to put away afterwards. Put any items from the counters into the cupboards if they have a spot to go so the counters are as clear as possible. If you are going to be doing the whole kitchen at once, I like to clear everything off of the counters and place them on the dining room table so that they are out of the way. It takes a few more minutes at the beginning, but will actually save time in the end. NOTE: This is just a quick tidy looking at things that are on the floor, obviously out of place, or that you know that you want to get rid of. Save big organizing projects for later!

Quick check list
Clean out and organise cupboards and drawers

· Clean out and organise pantry/larder

· Deep-clean cabinet fronts

· Deep-clean refrigerator and freezer (try and use what is left in the freezer if not then wrap     in paper and put into cool box and pop outside)

· Deep-clean oven, stove, and microwave
 Scrub grout (if necessary)
   Wash windows

· Oil wooden items

· Sharpen knives

What you need for non-toxic oven cleaning:
spray bottle with a mixture of 1/3 vinegar and 2/3 water
coarse salt
baking soda

Directions to clean an oven without chemicals:
1. Remove the oven racks (you can clean these separately the same way).
2. Spray the whole oven including the inside of the door with the vinegar/water mixture. Get it pretty wet all over.
3. Sprinkle baking soda everywhere putting more on any caked on food particles.
4. Sprinkle a thick layer of course salt over the baking soda.
5. Spray again with the vinegar/water. You’ll hear a nice bubbling sound from the reaction of the vinegar and baking soda.
6. Leave it to sit overnight.
7. With the course side of sponge scrub the oven. You’ll see how easily everything comes up. This was amazing to me.
8. Spray again with vinegar/water to help remove everything.
9. Wipe with old towels or paper towels.
Cleaning the microwave
All you need for this task is a microwave bowl, slices of lemon white vinegar and water
place your ingredients into the bowl and microwave on high for 5 mins leave the bowl in there for a bit longer after you remove the bowl just wipe around with paper towel. Your microwave will be sparkly & smell clean and fresh.
 Clean dishwasher and other appliances
For the dishwasher you need
Distilled white vinegar
Baking soda
Lemon essential oils (option)

Remove the bottom rack and spray the inside of your dishwasher liberally with vinegar.
Use a clean cloth to wipe down the seal and inside of your dishwasher.
Replace the bottom rack into your dishwasher. Pour 1 cup of vinegar into the bottom of your dishwasher.
Add 1 cup of baking soda into the bottom of your dishwasher. Optional: Add 3 drops of lemon essential oils to deodorize.
Run your dishwasher on the Light Wash cycle.

Cleaning your dishwasher once a month will not only make your dishes cleaner, but will deter mold and mildew from forming too. This method no only disinfects and cleans the inside of your dishwasher, but also helps clean the plumbing that is connected to your dishwasher as well.
Cleaning the washing machine
You will need
White Vinegar
Cleansing essential oil of choice (optional) Orange/ lemon/lime is my choice.
Rags
Small scrub brush or toothbrush.

Mix the vinegar 50/50 with water and add a few drops of your oil. If you like exact measurements, 1 cup vinegar, 1 cup water and 20 drops of oil is about what I do.

Pull out your soap dispenser and scrub it down good in your kitchen sink.

Next use the scrub brush to clean the area where the soap dispenser goes. I have been real good about cleaning that part of my front loading washer but was really surprised at the amount of mold I found there.

All those black spots are mold. Depending on the soap you use, you may need to really scrub at the soap scum. I use the pods that go straight in the machine which don't make that horrible scummy mess.

Clean the rubber seal.
That rubber seal is the main culprit when you have a stinky washing machine. clean the entire thing, being sure to pull it away from the drum and clean down in there.
While you are doing this, make sure to wipe down the door too.
Doing this a couple of times a month will keep the mold and smell away.
That’s when I remembered the lint trap.
That’s right. Did you know your washing machine has a lint trap? It does, and it’s pretty easy to clean.

Not all washing machines have a lint trap, However most of them do.
My washing machine has a lower panel that comes off by removing three bolts at the bottom, this reveals the lint trap, water pump and a few other things. A Google search has revealed that many machines have this.
Other machines have an even smaller panel that opens to reveal just the lint trap. Chances are, if your machine has this little panel, you already know about it.
.Clean that sucker off and scrub it good with vinegar. Be sure to clean inside where the trap goes as well. If you find a sock or two in there just throw them away, trust me, the stink is in them to stay!

·
   

Sunday, 20 March 2016

My little garden


As the weather is getting a bit kinder a good pair of wellies and jacket and I'm enticed into the garden...
A few Sundays ago I was able to get out and tidy the pots and jet wash the decking and garden.
I planted lots of tulip bulbs last year which are beginning to appear, as I don't have grass or dirt everything is grown in containers.
My favourite plant is of course the Peony followed by Jasmine and when I'm in my studio with the window opened it feels the room with its heady scent, I can't wait but before the summer arrives there are a few jobs I need to do, one is to paint my little wooden table & 2 seats make a couple of cushions for it last year I had a pretty bird print, I fancy a change but I haven't made my mind up yet, I need to get some samples.
I like to paint my terracotta pots last year my Mother in law gave me some so they will need painting and I will look around the Charity shops and markets for some interesting containers. I would love a bench up on the decking (maybe Mr D will get me one for my birthday).
I found some wonderful ideas that are simple & cheap


Terracotta pot recycled into accent table

Painted pot with saucer can be used as spare tables for drinks or for plants

Cute house frames with hearts

Little wooden plaques to brighten a dull wall space.


decorative garden table accessories for outdoor entertaining


you can buy blank candle sticks from craft stores, a couple of coats of paint  group as 3 and team them with a pretty table cloth it's  perfect for your afternoon tea. 


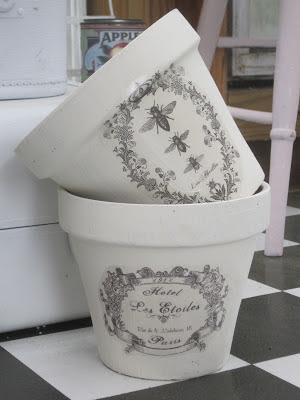
I've been wanting to do a copycat of this Pinterest pin since last summer. All you need are some flower pots, chalk paint and a few pretty French graphics. Put them all together and voila...Frenchy flower pots!

I gave each pot a coat of Old White ASCP. I also painted a little around the inside rims but not the entire way down. I got a little lazy and if I ever actually use them for plants, it won't matter anyway.

I used decal paper to adhere the images to each pot. These can be downloaded from free image sites (but check to make sure you can use them). The Graphics Fairy is where I look first.

I might do a few more in different shades of ASCP.
(Annie Sloane chalk paint)www.anniesloane.co.uk

Clean Living


Fabric softener labels by Torie Jayne:


If you are somewhat confused as to which are the safest and most effective cleaning products to use in your home, you are not alone. With increasing numbers of organic and “healthy” cleaning products hitting the market and a slew of conventional products battling for customer votes, it is super easy to become baffled.

One of the biggest problems with regards to cleaning products is that consumers do not receive all of the information that they need to make an educated decision. Because of labelling laws, it is increasingly easy for manufacturers to sneak in ingredients without making full disclosure on the labels.

Regardless of where you head for the information, be mindful when choosing the safest products for your family & friends:

ingredients must be displayed on the label.

Product should be made from plants and minerals.
Product must contain no petroleum or petrochemical ingredients.
Information about any fragrance used – it must be natural.
Product must be safe for grey water and septic tanks.
No animal testing, or animal-derived ingredients can be used.
Product must be free from any known human carcinogens, endocrine disruptors or teratogens.


Make Your Own

Keeping up with the list above can be exhaustive. A simpler, and much less costly approach is to actually make your own cleaning solutions from non-toxic ingredients. Here are some easy-to-make options for keeping your home clean while protecting your family and the environment.


Kitchen grime away

Ingredients:
1 1/2 cups baking soda
1/2 cup vegetable oil-based soap
1/2 cup water
2 tablespoons vinegar

Instructions:
Find an old cleaning supply spray bottle or purchase a new one. Be sure to clean the bottle well if you are using an old one. Add all the ingredients to the spray bottle.
Shake the bottle well to mix all the ingredients and dissolve the baking soda.
To use, spray on tile, floor, shower, tub, toilet, or sink and wipe clean with a damp sponge or rag.


Kitchen Bacteria Buster

Ingredients:
1 teaspoon baking soda
1/2 teaspoon organic dish soap
2 teaspoons vinegar
Warm water
20 drops lemon essential oil

Instructions:
Use a funnel to put the baking soda into a spray bottle.
Add the soap and vinegar to the bottle. Shake the mixture well.
When the mixture stops foaming, fill the bottle the rest of the way up with warm water. Shake again.
Add essential oil to give your cleaner a fresh scent. Shake again to mix well.
To use cleaner, simply spray on appliances, counter, or floor then wipe clean with a sponge or cleaning rag.


Wood Pick-Me-Up

Ingredients:
1 lemon
1 tablespoon olive oil
1 tablespoon water

Instructions:
Cut the lemon in half and squeeze the juice from both halves into a container. Try to avoid adding any pulp or seeds.
Add the olive oil and mix well.
Add the water and mix well.
To use, dab a microfiber dusting cloth into the mixture then wipe wood surface clean. Make a fresh batch each time you clean.


Clean Day Laundry Detergent

Ingredients:
2 bars ivory soap
2 cups baking soda
2 cups borax
20 drops lavender essential oil

Instructions:
Use a cheese grater to grate the soap into small pieces
Mix the grated soap and the baking soda and borax together in an airtight container.
Add some essential oil and stir in. Store the powder in the airtight container.
To use add 1-2 tablespoons to each load of laundry.

Air Refresher


Ingredients:

1 oz rubbing alcohol
6 oz filtered water
40 drops clove essential oil

Instructions:
Pour all of the ingredients into a spray bottle.
Shake the bottle to mix all of the ingredients.
To use simply spray into the air, on pillows, sheets, or furniture for a fresh and clean scent.


Tuesday, 1 March 2016

I

Believe......


You are the CEO of your household.


Inspiration can be found everywhere.


Sweatpants are never the answer.


Perfection is boring.


Being well dressed is a form of politeness.


Routines are the foundation of a well run household.


You are your choices.


Pink lipstick brightens even the dreariest days.


Audrey. Always Audrey.


In taking common occurrences and making them extraordinary.


Fresh flowers are a necessity.


laugh and love in abundance.


There is no such thing as failure. You have simply learnt that doesn't work.


Elegance will always be in style.

Friday, 19 February 2016

Old projects... New Wool x


I'm just a girl with a million projects going on at once. You know that type of girl don't you? It is fun to start projects but not so practical to have so many going on at once... They tend to be put away and forgotten and sometimes they never get finished. So instead of starting on something new after my latest  I decided to pick up something old.

I chose my Maybelle flowers And I'm in love. Again. They work up so quickly. They are so pretty. And they are so much fun to make. And it is the perfect time of the year to work with http://www.byclaire.eu/en/ I purchased myClaire yarn a few weeks ago their spring colors are so gorgeous. I'm going to join them and make a baby blanket. That is my plan. I almost got 36 flowers now. I'm making a grand pile of beautiful crochet flowers today.

NOTE:
Written original Maybelle Flower Pattern can be found here.


Once the blanket is finished I will share x


Saturday, 6 February 2016

Organisers


HOW TO USE A PLANNER & TO GET ORGANISED


I wrote in my last blog that I felt  January should not be a month for making changes, instead I spent it planning, mulling around ideas and I have to say it worked for me. How can we consider making important  changes to our lives  when  all but one month is taken up with events.


I often write about organising, it's a favourite topic of mine, sharing ideas & tips. From organising  your craft stash, and your craft spaces, to every nook & cranny in your home, but  this time I want to share a few little tips on how we can organise our hectic selves, in our ever so hectic lives.


While it’s hard enough to wake up with sufficient energy to tackle the day {at least for me!}, staying organised amidst hundreds of distractions seems almost impossible. Facebook notifications, email, picking up the house, or even feeding the cat captures my attention and before I know it, hours have passed by without me crossing anything off my carefully constructed list.
But daily structure is what helps us make the best use of our time, despite all those “important” demands. Even if you haven’t succeeded in the past, I encourage you to try again. Creating a flexible plan will not only help you stay on task,
 it will naturally aid you in the quest to become organized every single day! Two secrets I am letting out of the bag about being organised: it takes effort! & get an organiser that suits your needs.


You probably won’t find your ideal planner or inserts your first time out of the gate, and that’s okay, because the biggest tip I can give you for staying organised is not about inserts or tabs or stickers (but pretty is helpful)

The biggest tip for how to use your planner is…

well…

To actually use your planner.

Here are a few things I have come to realise....
It’s not enough to buy one – having an organiser will not make you organised.
It’s not enough to decorate the pages – pretty pages will not make you productive (for me it helps)
So, what do you have to do? 
Here is my 3 Step Plan:
Step One: Decide What You Want to Do
Step Two: Write it Down
Step Three: Do it!!

Easy right?

David Allen of Getting Things Done fame, says
“Your mind is for having ideas, not storing them”

And that’s where your planner comes in.


Here’s What I Do

First things first I write everything down.. and I mean everything. If I see an ad for something I think I might like to buy, I write it on my wishlist, if I decide that we are not eating enough spinach  I’ll write it in my meal planning section, if I get a notice about a craft or design show it goes into my planner before I even put the notice down.

One of my big realisation moments was accepting  that my brain alone could not be trusted!


I will admit that I have 2 planners 1 is small  and  portable, it spends time sitting open on my desk or in my bag. The second one is large and no longer portable and holds the key to my life....

Decide what you want to organise and what scale, my lists include

To do Lists

Meal planning/shopping

House Cleaning/Seasonal

Birthdays/special events

Blog prep/photos collected

PinkPeonyPetal agendas

Some people may think that this kind of organization is unnecessary or tooooo much, but to each his own. I need everything written out & in front of my face to feel comfortable with the day’s antics.
If you’re like me, it probably even gives you a weird satisfaction to have each part of the day planned out seamlessly, too.
I had the whole of January perfecting this planner to fit my lifestyle. I’m not even exaggerating when I say I am so happy and pleased with my self, So nice having everything in working order. It makes me feel so…. clean? Is that normal for any of you?

Maybe you have now decided that starting a planner or improving your existing one is a good idea, lets think about personalising it....

The great thing about planners is that there are nearly an endless amount of ways to customise them and add personality to keep you motivated with your daily goals and to-dos! Although I use a Filofax Original Planner in Fluoro Pink, you can use most of these customisations in any planner you own and use, from a Kate Spade, to an Erin Condren and even a Sugar Paper planner
Pens

A really cute and coordinating pen is must have item in my planner, I think adds a lot of personality to it. There are quite a variety of pens out there in planner world, and among them multipens like the Pilot Hi-Tech C Coletto are very popular because they give you the ability to write in a variety of colors! Friction pens as well are very popular because they are erasable and as a planner person, you know how scary it can be to write in an appointment and then have things change! I brought mine from Ebay they came from China and they are perfect.

 Charms

Planner charms are a very fun way to add personality to your planner because you can literally use a wide variety of charms to coordinate with your interests. Although many sellers on Etsy make custom charms in fun shapes like coffee cups, cute animals and even desserts, you can find charms at your local craft store or use ones off a key chain I like a bit of bling.


Custom Dashboard


As one of the first pages in your planner, a custom dashboard can do a lot to help motivate and inspire you whenever you open it up, It’s simple enough to make your own dashboard by laminating pretty scrapbook paper or cutting down an acrylic screen print to size. I recommend using acrylic prints or laminating regular paper so your dashboard is coated and more durable- it also works well for holding and removing sticky notes.


 Custom Dividers


Custom dividers are an excellent way to create a theme for your planner. You can purchase sets of themed dividers on Etsy, but I like to make mine by printing out images and pictures, adding tabs and then laminating everything so it’s nice and sealed. Use your own pictures, quotes, and snippets from magazines to create a collage for your dividers or stick to pretty scrapbook papers if you like a simpler look.


Page Markers


I love to use page markers to help me quickly locate important notes and pages in my planner. There are lots of different varieties of page markers; magnetic ones, paper clips, and even adhesive tabs. They are a great way to add color and style to your planner that you can appreciate even when your planner is closed.


 Printable Inserts
Although your planner may come with a set of dedicated inserts, there is always room for more, specifically, for fun and inspirational inserts that help to add personality to your planner and keep you on track with more than just your to-dos and schedule! The insert above is actually a free printable checklist titled Inserts like this are a great way to add inspiration to your planner and to add a little fun to your days.

Stickers & Washi

Although planner decoration isn’t for everyone, if you do want to add a little fun and interest to your planner pages, using stickers and washi tape is a fun way to do it! I have quite the collection of washi tape and I always have more than enough stickers around because I usually make my own and print them onto full sheet labels! 

DIY Folder

Not all planners are created with equal amounts of pockets and storage, so if you need an extra space to store stickers and notecards or whatever else you need to keep inside your planner, check out this easy DIY Folder Tutorial that shows you how to turn a regular file folder into the perfect little storage solution for your planner!

Personalize Your Planner with DIY Folders


Colorful Paper

Why use plain old white paper in your planner when you can quickly add interest to your pages by using rainbow-colored copy paper? I keep a stack of colorful papers around and cut them down to size and punch them in my planner. They are great for color coding notes or visually dividing up sections or just adding a little fun to your pages.


I hope you have enjoyed this as much as I for sharing x