Saturday 28 March 2015

Bleaching pine cones

Good evening...

yesterday we mentioned whether we had started our Christmas crafts, Cones play a big part in ours.
Pine cones are a fun accent for wreaths and floral arrangements, and they also look beautiful displayed on their own on a mantel or coffee table. While they are usually associated with Autumn or Winter, pine cones can enhance your home all year long, especially when they are bleached. Bleaching gives the pine cones an aged, whitewashed patina that is works for both modern and rustic décor schemes  it will also help when you paint them.
Here is how we do it...
 
Gather Materials

Pine cones
Liquid bleach, gallon size
Plastic bucket
Rubber gloves
Ceramic or glass plate
Brick
Newspapers

Place Pine Cones in a Bucket

Line your work surface with newspapers in case the bleach splashes. Dust off any excess dirt from the pine cones and place them in the plastic bucket. For best results, bleach pine cones in small batches to make sure that the gallon of bleach will cover all the pine cones in the bucket. You can reuse the same gallon of bleach for more than one batch.

Just a few simple materials will do the trick.


Bleach pine cones in small batches.


Pour Bleach Into the Bucket

Slowly pour the bleach into the bucket until the pine cones are covered


Weigh Down the Pine Cones

The pine cones need to be fully submerged in the bleach, but they will want to float up to the surface. To prevent this from happening, place a ceramic or glass plate on top of the pine cones with a brick on top of the plate to keep it down. Wear rubber gloves at this point, as you will be touching the bleach.

The bleach starts working right away.


A plate and brick keep the pine cones submerged.


Let the Pine Cones Air Dry

Leave the pine cones in the bleach overnight, for a maximum of 24 hours. You will notice that the pine cones have closed up. Wearing rubber gloves, remove the brick, plate and pine cones, and place the pine cones on paper towels. Take the pine cones outdoors and let them dry naturally. As they dry, they will open up again. The process usually takes one to two weeks, depending on the humidity. Air drying them outdoors will eliminate any bleach smell. If you wish to scent your pine cones, store them in a sealed container with several drops of an essential oil for a month.


Cinnamon is a popular scent for pine cones displayed in homes.


Thursday 26 March 2015

Wool I Love

I love to knit & crotchet and have a vast supply of wool in all shades of colours.
But I do have my favourites these are the Merinos and the cashmeres not only do they come in the most delicious shades they are soooo soft.
They are a little bit more expensive but worth every penny, If you love wool you will know what I'm saying.
I buy my wool on line from Wool warehouse or Deramores their service is second to none from their well stocked sites to delivery, I always get excited when my quarterly bundle is delivered.
I always have a couple of project on the go, I am still working on the blanket mentioned in a few posts ago also I am knitting some baby jackets & cardigans & crocheting some flowers.
I will share some pics with you, I do sell so please feel free to check out my FB pages PinkPeonyPetal.


Blue Sky Alpacas Royal Petites - royal alpaca  http://www.knitculture.com/yarn/companies/blue-sky-alpacas/blue-sky-alpacas-royal-petites.html
How gorgeous is this basket of Rooster wool that has just hit the website?
Rooster Almerino Baby Rooster yarn new deramores


A favourite combination...
Rowan Alpaca
 luxury yarn developed specifically for babies. A machine washable blend of merino wool and silk that has a wonderful soft handle for your little treasures.

Merino Knitting Wool

DMC Woolly Merino wool is beautifully soft to the skin. Sourced from Australia it is 100% natural and renewable. Woolly’s unique quality comes from its long, thin fibres that give superior softness to touch and a feeling of comfort when against the skin.
Available in 48 beautiful colours with patterns and inspiration to match.

...pastel yarn...Debbie Bliss Baby Cashmerino primrose, baby pink, baby blue and mint ♥
Pastel yarn by Debbie Bliss
Baby Cashmerino
50g balls in primrose, baby pink, baby blue, mint


Sunday 22 March 2015

Easter Inspiration


Is it just me or has the first part of the year flown past.
This Friday is officially the start of Spring & I am very busy trying to keep up with everything.
My spring cleaning has been cut short this year due to the Kitchen being remodelled
at the moment I have no ceiling, and no plaster on some of the walls.
I do however have time  to share some Easter inspiration


I would love this on my Easter table. I am going to have to ask Mr D to look through the Christmas box & get my Gingerbread mould out,  that should be fun.


I found these cheeky bouncing eggs @ not on the high street.
 
 
These origami bunny serving dishes I also found @ not on the  high street
but can be DIY
 
 
 I think I will be spending tomorrow on my Easter decorations.
xx


Tuesday 17 March 2015

Icing Sugar cookies


now to ice those little biscuits....
there is only one type of icing that I have ever used, that is ROYAL ICING.  There are other recipes available, but royal icing is my favourite, and  would  always use unless  specifically stated otherwise.  If you would like to try this recipe, click HERE for a printable version.
 The other icing words used like outlining , piping, flood, fill, and twenty-second icing are used to describe consistency rather than recipes.
 Bottom line is, you are working with one icing and adjusting the consistency  to make it do different things.
 Normally, you begin by using piping icing to outline the cookie.  This creates a border or “dam” to make sure the icing does not flow over the edges

 Outlines can be very basic or complex, but in MOST cases, they are the “blueprint” of the cookie.
 

After the cookie is outlined, a thinner version of the same icing is used to fill the outlined area.  This is called FLOODING.  It will usually flow until it fills the entire cookie.  If I am in a hurry like I usually am, I use an offset spatula to speed things along.


  • Always use a spray bottle to thin your icing.  
  •  “Give it a Shpritz” article HERE.  I highly recommend it.  It literally changed the way I iced a cookie.
  • Play around with the consistencies.  What works for me, may not work as well for you.  The key is to find your groove.  I bet I know over 100 women who make excellent cookies, and not one single one of us does things EXACTLY the same.
  • USE Karen’s bag trick when preparing piping icing.  This isn’t even a request, it’s an order.  When you are at the park with your kids and NOT home washing icing bags, you will thank me.
  • Keep a toothpick, cookie scraper, handy to pop those pesky bubbles
  • I also have a helpful articles on Coloring and Preparing Royal Icing and a step-by-step pictorial on how I make royal icing that can be viewed by clicking the links.
  •  Feel free to add any tips you might have, or ask questions.  There is a no-dumb-question clause specifically attached to this post.  Keep your eyes open for my upcoming post demonstrating the difference between flood icing, and the slightly thicker 20-second icing.

Easter cookie recipe


This is the BEST sugar cookie recipe I could find- no chilling the dough, cookies kept their shape when baked, soft and flavourful, perfect for decorating.
& comes together quickly.
It does NOT need to be chilled.
It can be doubled easily.
It holds its shape with very little expanding when baked.
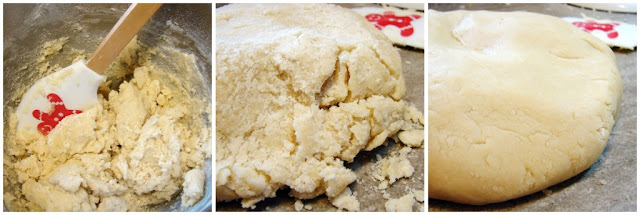
The recipe I am giving you makes a large batch of dough because I like to bake a lot of cookies. Also I like to roll and cut my cookies fairly thick…to hold a lot of frosting. Incorporating the last cup of flour may make you nervous. It will be dry and look crumbly. Turn out the dough and work with wet hands until the dough is smooth and ready to roll.

BEST Sugar Cookie Dough Perfect Edges Every Time inkatrinaskitchen.com from @katrinaskitchen

Ingredients:

1 Cup butter, softened
1 Cup granulated white sugar
1 teaspoon vanilla extract
1/2 teaspoon almond extract
1 egg
2 teaspoons baking powder
3 cups all purpose flour

Directions:

  • Preheat oven to 350° F.
  • In the bowl of your mixer cream butter and sugar until smooth.
  • Beat in extracts and egg.
  • In a separate bowl combine baking powder with flour and add a little at a time to the wet ingredients. The dough will be very stiff. If it becomes too stiff for your mixer turn out the dough onto a countertop surface. Wet your hands and finish off kneading the dough by hand.
  • DO NOT CHILL THE DOUGH. Divide into workable batches, roll out onto a floured surface and cut. You want these cookies to be on the thicker side (closer to 1/4 inch rather than 1/8).
  • Bake at 350 for 6-8 minutes. Let cool on the cookie sheet until firm enough to transfer to a cooling rack.

Notes:

  • PLEASE NOTE: This recipe has been edited to make a smaller batch than originally published to accommodate the size of stand mixer that most people own. The original recipe was this exact recipe just doubled proportions.
  • If you must chill the dough just leave it on the countertop for 10 minutes before rolling or work the dough with your hands for a few minutes.
  • You can omit the almond extract if you do not have it available, however the taste is really fantastic with the hint of almond.
  • Keep in mind that the recipe yield will vary according to how thick you roll your cookies and how large or small your cutters are.
Icing cookies on another post....
Original recipe and images © In Katrina's Kitchen 

Sunday 15 March 2015

Friday 13 March 2015

3 Easter projects


Hi I do hope you are all enjoying your weekend...
Another beautiful day so I couldn't resist sitting out in the sunshine
and completing a couple of the projects especially the ones for my Easter table
Here is a quick pic
please excuse the messy backdrop.
These were 3 terracotta pots painted light pink, medium pink & lavender
although it does look a bit dark.
I then attached white resin roses
I haven't decided what to do next maybe sweets or candles.


A few posts back I mentioned giving homemade sweets to family and friends
I have been practicing...
I would like to give the ladies in my life a pretty box filled with
delicious treats,
I decorated this box with Kusudama, little Japanese origami flowers
I am really pleased with how its turned out.


Bunny biscuits with pastel icing ideal for our Easter tea.


Friday 6 March 2015

Easter Decorating

 
Notebook
Ashley Wilde fabric - Beadtime Kingston
Spotted fabric-Beadtime Kingston

Hessian-from stash
Peat Pots- Poundland
Lace-from stash
Ribbon-from stash
Diamond brooches-EBay
Moss- local- florist
Coffee filter papers- own
Cream flowers- Beadtime
Polystyrene eggs, nest, spotted bird, glass tree decorations, Rabbits-Tiger Kingston


So far I have the fabric, the pretty bird print from the Ashley Wilde collection will be one panel for cushions and enough left over for napkins same for the spotted print which will be the other side of the cushion and napkins.

I have started to decorate peat pots for the table.
 I have made these before for wedding favours I always like to keep a stock.

I painted duck one egg duck egg blue the other is plain wood, I can't make up my mind

The little birds nest will go on the Easter table along with the little rabbits

I am going to make little treat bags out of the hessian fabric.


I just made this as a trial for some wedding favours
I think they are pretty for a spring wedding
they are an origami flower Kusudama, In these eco friendly times
brides are opting for these.


Tuesday 3 March 2015

Spring approaching

Happy Monday xx
I hope you all had a wonderful weekend. How beautiful was the weather Sunday despite the wind the sun was quite warm, my sis came over for brunch Jen comes over regularly from South Africa to work and catch up with us and we love seeing her we spent time at the park with son, daughter, daughter BF & granddaughter, I am always happy when I have my family around me even when it's hectic and believe me that's 99% of the time.
Saturday was  different Miss D & I spent the day in Kingston, Mr D & Miss D's boyfriend
spent the day bringing down the kitchen ceiling I can't believe the dirt & dust despite everything being covered It has taken hours to clean!! and I have to finish my spring cleaning I am hyperventilating  it's not going to happen!!!
With all that's going on I am going to take refuge in the hunt for ideas for my Easter display I decided my scheme should be muted shades of lavender, pink, duck egg blue, grey I think a bit of rustic bling is in order too.
Now the best part sourcing all the goodies and putting it all together.

Here is my inspiration I am getting excited already....watch this space


Moss balls, speckled duck egg blue, painted eggs, terracotta pots
Silk wrapped eggs


painted pots, moss, pretty flowers


birds nests


fabric & ribbon decorated eggs
 
DECORATE YOUR HOME FOR EASTER (36)
homemade chocolates & cakes I think
 
 
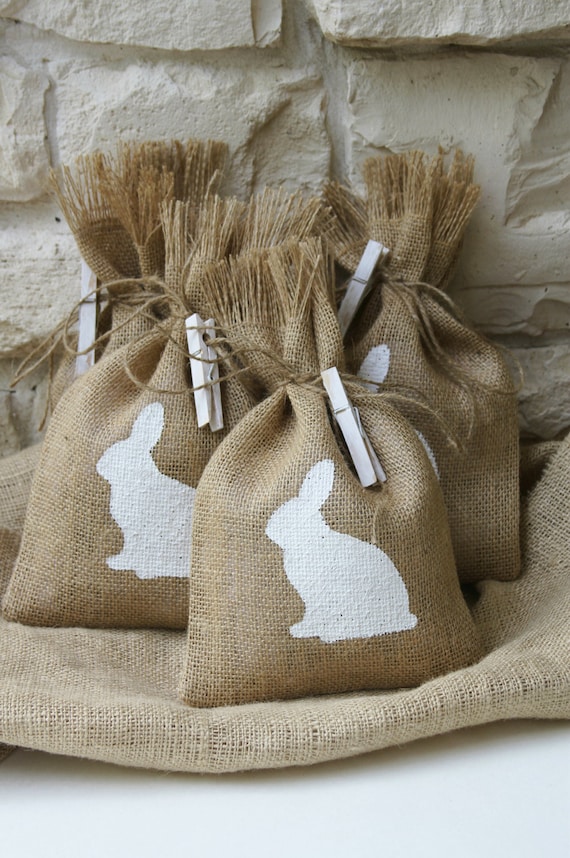
Burlap Gift Bags or Treat Bags, Set of FOUR, Easter, Baby Shower, Birthday Party, Shabby Chic Gift Wrapping, White and Natural, Bunnies.
Little stamped burlap bags
for treats
 

Sunday 1 March 2015

Kitchen re style my ideas my plans

Mr D and I thought it was about time our house had a re style.
This time round it's a grown up scheme by this I mean surfaces don't have to be wipe clean, soft furnishings can be a little bit luxurious.
The kitchen is the 1st room on the list and there is quite a lot to do and whilst we can get on with the "unskilled" bits like pulling down ceilings, removing units & tiles, walls will need plastering a floor laid and a door bricked up by our builder.
I have been planning for a year & have collected enough ideas to hopefully pull a  scheme together.
Although we haven't picked the units yet I know the style & colour, our home is a
Victorian terrace my style is modern country as much as sleek shiny surfaces are wonderful  I don't think there for my little house, I want a relaxed luxury scheme on a budget and I know how to get it!!!!


#DIY Kitchen Remodels – Do it Yourself or Hire a Contractor?
Grey units white tiles/walls butler sink

Obsessed with this website!  Do you ever see a random, inanimate object and think, "That is the exact color I am looking for to paint the walls in my room."  Design Seeds does just that--browse hundreds of color palettes based off anything from an artichoke, to a bracelet, to feathers.flora tones

I can't make my mind up.....
Grey will be the emblem colour for the whole house and both these schemes
do it for me!!! the one on the right however is a touch more dramatic
the left side more relaxed.
I will have to play around with them & possibly end up with both!!!

 The next thing for me to think about is flooring wood laminate tiles or lino what ever, it has to be white, easy clean, waterproof, tough

Lighting sorted once the new ceiling is up the electrician will come in and put in recessed lights.

Storage is very important, I won't have much money left I  will need to be clever & make some baskets!!!
I found this excellent tutorial the source is Marrietta.ru


 recycling crafts project  a fabulous way to use up old newspapers as well as a great way to learn how to weave. Add style and additional organization to every room to your home. These baskets are welcome everywhere except for the bathroom its too humid sometimes

Photo 1.  Be inspired and study details of these amazing baskets.
Step 1/photo 2: Cut the newspapers in long strips of about 3 inches. Note how the paper is torn lengthwise. This is important as it will be stronger than if the paper would be torn sidewise! Roll the paper at a 45 degree angle.
Step 2/photo 3: With a glue stick secure the end of the roll.
Step 3/photo 4: Cut a piece of cardboard to measure the length and width of the base of your baskets.  Glue on strips of paper on tit at about 2 cm (approx. 1”) intervals and use clothespins to secure them while drying. Space the strips evenly along each edge of the baskets. Add 2 additional strips in every corner leaving a 1/3” of space in between.
Step 4/photo 5: Once the glue is dry, glue on another piece of cardboard on top of the strips, to secure them all firmly into place. Again, use the clothespins to keep things tidy and firm.
Step 5/photo 6: Place a cardboard box (with something in it, for weight) along the inside of your basket-to-be and start weaving. Fold the first strip upwards, locking it with the second strip, and continue to do so for each strips till the whole basket is done.  Look at the picture to see clearly what I mean. 
Step 6/photo 7: Secure each strip at the top of the temporary inner-basket and ensure that each strip stays up perfectly straight!
Step7/photo 8: This may be a bit tight and tricky but lock the last strip of paper with the first strip as is shown in the image.  Now you are ready to start weaving!
Step 8/photo 9: With some glue and a fold under, secure your first weaving strip  and so start using up the gazillion paper strips you have made.
Step 9/photo 10:  When you have reached the desired height of your baskets, undo the top strips of your baskets and fold them over and tuck them into the basket to secure them, going all around the basket.
And voila, you have woven your first basket. Now that you have gotten the hang of things, no doubt many more will follow. Measure the sizes of tricky cabinets and areas where none of the standard-sized store-bought baskets would fit and make your own! You will be so happy with your new organization!!!

If you make a couple, you can spray paint them all at the same time. Otherwise, do one at the time. If you choose a copper brown paint, your baskets will look like they have been woven from branches! If you choose white, they will have that crisp look to them that I personally love!!!

Happy weaving!

woven_paper_basket


Super clever ideas for the kitchen at the36thavenue.com

Make your own eco kitchen towels
these are a fantastic idea, they can be used over and over again just pop them in to the washing machine dry them clip them back together et voila!!!!
This idea is from The short girl's blog
Thank you for sharing

Supplies (for one towel)
Basic sewing supplies
Cotton print, 11.5 x 11.5  
Terry cloth, 11.5 x 11.5
Plastic snaps and the assembly/installation tools update: I got my snaps here.
Coordinating thread 


Cut out your fabric, try to get the pieces as square as possible so your towels wont be all wonky. This can be difficult with the terry, as it does stretch, so just be patient with yourself.  
Placing right sides together pin the terry cloth and cotton print together.  Sew (3/8 inch allowance) all the way around the towel, being sure to back stitch when you start and stop. 


If you feel more comfortable with a larger seam allowance go for it, just be consistent so all the finished towels are the same size.  Leave a 2 inch opening on one side for turning. 


Trim the corners to remove some bulk (which I forgot to photograph sorry), at this point you might also want to trim the edges if you used a larger seam allowance.  Through the 2 inch opening turn the towel right side out, push out the corners and tuck in the "flap" of the opening


Turn


Push


Tuck

Almost done!   Iron it very well, pressing the seams flat.  To give the towel a nice completed look top stitch 1/4 inch from the edge all the way around.  This will also serve to close up the 2 inch opening.  


Next install the snaps, two female down one side and two male on the other side.  ....and done! 


 Now go do it five more times and you will have a full set. 


snapped together set


Clever ideas for the kitchen at the36thavenue.com

Waste not basket in fridge
I will be having one of these

A few tips on kitchen organisation
Store things where you use them.
Pots and pans are best kept near the range or cooktop; mixing bowls, near the countertop you use for food preparation; plates, glasses, and flatware, near the dishwasher.

 
Group like items together.
Store all bakeware in the same cupboard, all wooden spoons in the same ceramic crock, all spices in the same drawer.

 
Revise your storing technique.
Store your most frequently used items in the most accessible places. Keep things you use most often at eye level; store heavy items below waist level and infrequently used items on high shelves (keep a step stool within easy reach for such items) or in another area of the house. For example, if you use your oversized turkey platter only once a year, you don't need to store it in the kitchen at all. Instead, stow it on a high shelf in the garage or basement.

 
Declutter yearly.
Take an inventory of all utensils, cookware, and dishware annually. Get rid of unnecessary duplicates, items that are damaged beyond repair, or things no longer used.

 
Clump small things together.
Keep small kitchen items in containers, see-through bins if possible, with neat, easy-to-read labels.


I'm thinking new T Towels.....
 To make your own, you’ll need the following: 
 tea towels, non porous flat surface, paint for fabric, fabric medium, sponge roller,
rubber stamps, iron.
I used the Martha Stewart paints since they’re inexpensive, readily available (found mine at Amazon), designed for use on fabric, and they come in such nice colors. Be sure to buy the fabric medium, that’s what keeps your paint thin, soft, and washable.
1.  If you want to make your own color, first mix it together, then 2. add the fabric medium after the color is mixed. I used about one part medium to one part paint. 
mix paint and medium steps
Next, roll your paint on a nonporous flat surface (I wrapped a piece of plywood in aluminium foil).  4. Use the sponge roller to apply it to the stamp.  I found the colour came out more even this way instead of placing the stamp directly into the fabric paint.
roll paint on stamp
Next, apply your stamp in your pattern of choice.  Sponge roll a light coat of paint before every single stamp for even colour distribution.
begin stamping
Change colours and sizes to add interest!
 
 
continue with little stamp
I also made a second version with another old speck
speckled stamp
The paints are water based, so clean up is crazy easy, just a little water.
wash off stamp 2
Allow the paint to dry for 24 hours, then heat seal your paint with an iron. I placed a plain cotton sheet between the tea towel and the iron to prevent direct contact.
heat seal paint
Once you’re done, you have your own custom tea towels that are unique and completely washable.  I recommend a delicates setting on your washer, just to preserve all your hard work.
diy stamped tea towels cg
stamped tea towels
So pretty and so easy, and they make great gifts.  You can apply the same technique to simple cotton to make pillows or window panels too, have fun creating your own!